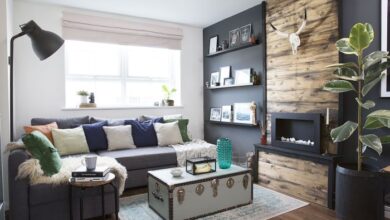
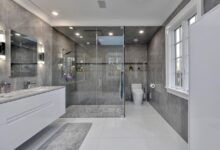
Small Bathroom Remodel Ideas offer a unique challenge: creating a functional and stylish space within limited square footage. Transforming a cramped bathroom into a haven of relaxation and efficiency requires careful planning and creative solutions. This guide explores space-saving strategies, color palettes, lighting schemes, fixture choices, material selections, visual enhancements, and budget-friendly options to help you achieve the bathroom of your dreams, no matter the size.
From maximizing vertical space with clever storage solutions to strategically using mirrors and light to create an illusion of spaciousness, we delve into practical tips and design techniques. We’ll also explore how color, lighting, and carefully chosen fixtures can dramatically impact the overall feel of your small bathroom. Get ready to discover how even the smallest bathroom can be both beautiful and functional!


Space-Saving Strategies

Transforming a small bathroom into a functional and stylish space requires clever planning and the strategic use of design elements. Maximizing space and storage is key, and this can be achieved through thoughtful layout design and the incorporation of smart storage solutions. This section will explore several effective space-saving techniques ideal for small bathroom renovations.
Small Bathroom Layout with Built-in Shelving
A well-designed layout is crucial for maximizing space in a small bathroom. Built-in shelving offers a significant advantage, providing ample storage without encroaching on valuable floor space. Consider a layout where shelving units are integrated into the walls, perhaps flanking the vanity or positioned above the toilet. This maximizes vertical space and keeps toiletries and other items neatly organized and readily accessible.
Deep, narrow shelves can be particularly effective for maximizing storage capacity within a limited depth. For instance, a recessed shelving unit above the toilet, approximately 12 inches deep and spanning the entire wall width, could accommodate towels, extra toilet paper, and cleaning supplies. Similarly, shelving units integrated into the vanity area can house toiletries, medications, and other bathroom essentials, keeping the countertop clear and clutter-free.
The key is to carefully measure the available space and design shelving units that are both functional and aesthetically pleasing.
Clever Storage Solutions for Small Bathrooms
The following table presents a variety of clever storage solutions, categorized for easy understanding. These options are designed to optimize space utilization and maintain a clean, organized bathroom environment.
| Category | Solution | Description | Benefits |
|---|---|---|---|
| Wall-Mounted Storage | Floating shelves | Shelves mounted directly to the wall, leaving floor space unobstructed. | Maximizes vertical space, creates a clean, airy feel. |
| Cabinetry | Recessed medicine cabinet | A medicine cabinet built into the wall, minimizing protrusion. | Concealed storage, saves counter space, adds a touch of elegance. |
| Under-Sink Storage | Pull-out drawers | Drawers that slide out from under the sink, allowing easy access to items. | Maximizes under-sink space, keeps items organized and visible. |
| Multifunctional Furniture | Vanity with integrated storage | A vanity with drawers and/or cabinets built-in, providing ample storage. | Combines functionality and style, centralizes storage in one unit. |
Strategic Use of Mirrors to Create the Illusion of More Space
Mirrors are not merely decorative elements; they are powerful tools for visually expanding a small bathroom. Strategically placed mirrors can significantly enhance the perceived size of the room. A large mirror positioned opposite a window or light source will reflect natural light, making the space feel brighter and more spacious. Consider a full-length mirror on the back of the bathroom door, or a large mirror above the vanity to create a sense of depth and openness.
The reflection of light and surrounding elements creates the illusion of a larger space, significantly impacting the overall feel of the bathroom. For instance, a mirrored wall behind the vanity can double the perceived size of the room, especially if the mirror reflects a light-colored wall or a well-lit area.
Utilizing Vertical Space for Storage in a Small Bathroom
Vertical space is often underutilized in small bathrooms. By maximizing vertical storage, you can significantly increase storage capacity without compromising floor space. Tall, narrow cabinets can be placed along walls, utilizing the height of the room effectively. Stackable storage containers can also be used to organize items on shelves. Consider installing a tall, narrow linen closet or a vertical storage unit to hold towels, extra toiletries, and cleaning supplies.
This strategy allows for a more efficient use of the available space, maximizing storage potential while maintaining a sense of openness. For example, a floor-to-ceiling storage unit next to the shower can house towels and bathrobes, freeing up valuable counter space and keeping everything neatly organized.
Color Palette and Lighting
A well-chosen color palette and strategic lighting plan are crucial for maximizing the perceived size and enhancing the ambiance of a small bathroom. Light, reflective colors and a thoughtfully designed lighting scheme can transform a cramped space into a bright and airy haven. The interplay between color and light creates a powerful visual effect, significantly impacting the overall feel of the room.
Color Palette for Spaciousness, Small Bathroom Remodel Ideas
Light and neutral colors are the foundation for creating a sense of spaciousness in a small bathroom. Pale blues, soft greens, whites, and off-whites reflect light effectively, making the room appear larger than it actually is. Consider using a single, dominant light color on the walls and then introducing subtle variations through accessories and smaller features. For example, a pale grey-blue on the walls could be complemented by white trim and pale wood-toned vanity.
Adding small pops of color through towels or artwork can inject personality without overwhelming the space. Avoid dark or heavily saturated colors, as these tend to absorb light and make the room feel smaller.
Impact of Lighting Options on Perceived Size
Natural light is the most effective way to make a small bathroom feel larger. Maximizing natural light sources, such as windows, is paramount. If natural light is limited, strategic placement of artificial lighting can mimic its effect. Recessed lighting provides even, ambient illumination, preventing harsh shadows that can make a space feel smaller. Vanity lighting, focused on the mirror area, is essential for task lighting but should be carefully chosen to avoid creating stark contrasts.
Poorly placed or overly bright lighting can actually diminish the perceived size, while soft, diffused light creates a more open and inviting atmosphere.
Lighting Scheme for a Small Bathroom
A successful lighting scheme for a small bathroom incorporates both ambient and task lighting. Ambient lighting, such as recessed lights installed in the ceiling, provides general illumination throughout the space. These should be energy-efficient LED lights with a warm white or soft white color temperature (around 3000K) to create a relaxing atmosphere. Task lighting, focused on specific areas, is crucial for functionality.
This includes well-placed vanity lighting, which could be integrated into the mirror or mounted on either side. Consider using LED strip lighting underneath the vanity for a subtle, ambient glow that also highlights the vanity’s design. Adding a small, stylish pendant light above the shower area can provide both ambiance and functional lighting.
Using Color to Highlight Architectural Features
Color can be used strategically to accentuate positive architectural details and subtly downplay less desirable ones. For instance, a lighter color on the walls can make a low ceiling appear higher, while a darker accent color on a specific wall can draw the eye and create a focal point, diverting attention from any perceived limitations of the space. Using a slightly darker shade of the main wall color on the lower third of the walls can create a visual effect of grounding the space, making it feel more substantial and less cramped.
Similarly, painting the trim a slightly lighter shade than the walls can make the room appear larger and more airy. These subtle techniques can create a sophisticated and spacious feel in a small bathroom.
Fixtures and Fittings
Choosing the right fixtures and fittings is crucial for maximizing space and functionality in a small bathroom remodel. The dimensions of your chosen items will significantly impact the overall feel and usability of the space. Careful consideration of each element, from the toilet to the faucet, is essential to achieve a balanced and aesthetically pleasing design.
Compact Toilet, Sink, and Shower Comparison
Selecting the appropriate sanitaryware for a small bathroom requires careful consideration of size and functionality. The following table compares different compact options:
| Feature | Compact Toilet | Space-Saving Sink | Compact Shower |
|---|---|---|---|
| Dimensions (approx.) | 24″ W x 15″ D | 18″ W x 14″ D | 32″ W x 32″ D |
| Types | Round-front, elongated, wall-hung | Corner sink, wall-mounted, vessel sink | Walk-in, corner, sliding door |
| Material | Porcelain, vitreous china | Porcelain, ceramic, glass | Acrylic, fiberglass, tempered glass |
| Water Efficiency | 1.28 GPF or less (high-efficiency models) | Low-flow faucets available | Low-flow showerheads available |
Space-Saving Shower Enclosure Specifications
A space-saving shower enclosure for a small bathroom could measure approximately 32″ x 32″ for a corner unit, or 36″ x 36″ for a square enclosure. Materials should prioritize durability and water resistance. Tempered glass is an excellent choice for its clarity and strength, while acrylic offers a more budget-friendly option. Frameless designs maximize the feeling of spaciousness, while sliding doors are more efficient in smaller spaces than swinging doors.
A low-profile shower pan minimizes the visual impact and helps maintain floor space.
Small Bathroom Design with Corner Sink and Walk-in Shower
This design incorporates a corner sink and a walk-in shower to optimize space.Layout:The walk-in shower, measuring 36″ x 36″, occupies a corner of the bathroom. Opposite the shower, a corner sink (18″ x 18″) is installed, maximizing the available space. A compact toilet (24″ x 15″) is positioned adjacent to the sink. Sufficient space is left between fixtures for comfortable movement.Dimensions (approximate):
Total bathroom area
60″ x 60″ (or adjust based on available space)
Walk-in shower
36″ x 36″
Corner sink
18″ x 18″
Compact toilet
24″ x 15″
Small Bathroom Faucet Styles
Three faucet styles that complement a small bathroom design are:* Wall-mounted faucets: These free up valuable counter space and create a clean, minimalist look.
Single-handle faucets
These are simple to use and offer precise temperature control.
Gooseneck faucets
These offer a touch of elegance and can be particularly effective in a vessel sink setting, although they require more counter space.
Materials and Finishes
Choosing the right materials and finishes is crucial for maximizing the impact of your small bathroom remodel. The goal is to create a space that feels open, airy, and luxurious, despite its limited size. Careful selection of materials can significantly contribute to achieving this effect. Light colors, reflective surfaces, and strategically chosen textures play a key role in making a small bathroom feel larger and more inviting.
Light and reflective materials are your best friends when renovating a small bathroom. These materials bounce light around the space, creating an illusion of more volume. Glossy surfaces, such as polished porcelain tiles or mirrored accents, effectively amplify the available light, minimizing the perception of cramped quarters. Conversely, dark or matte finishes can absorb light, making the space feel smaller and more enclosed.
Flooring Materials in Small Bathrooms
The choice of flooring material significantly impacts the overall feel of a small bathroom. Different materials offer various advantages and disadvantages regarding durability, maintenance, and aesthetic appeal.
Tile, a popular choice, offers excellent durability and water resistance, making it ideal for high-moisture environments. However, the grout lines can accumulate grime, requiring regular cleaning. Large format tiles can visually expand the space, while smaller tiles can create a busier look. Vinyl flooring, on the other hand, is more affordable and easier to install than tile, offering a wide range of styles and colors.
However, it may not be as durable or water-resistant as tile, and can show scratches more easily. Other options, such as waterproof laminate or luxury vinyl plank (LVP), provide a balance between cost, durability, and aesthetic appeal.
Wall Tile Options for Visual Expansion
The right wall tiles can dramatically alter the perceived size of a small bathroom. Light-colored tiles, particularly those with a glossy finish, reflect light and create a sense of spaciousness.
- Large-format tiles: These minimize grout lines, creating a clean, uncluttered look that makes the space appear larger.
- Light-colored tiles with subtle patterns: Subtle patterns add visual interest without overwhelming the space. Consider soft greys, whites, or pastels with delicate veining or textures.
- Vertical stripes: Vertical stripes on the wall tiles can draw the eye upward, creating an illusion of height.
- Mirror tiles: Incorporating mirror tiles, either as a full wall or accent feature, dramatically expands the visual space by reflecting light and surrounding elements.
- Glass tiles: Glass tiles are highly reflective and create a bright, airy feel. They come in a variety of colors and finishes, allowing for creative design options.
Grout Color Selection for Visual Appeal
Grout color is often overlooked, but it can significantly impact the overall aesthetic and perceived size of a small bathroom.
Light-colored grout, such as white or a very light grey, helps to create a seamless look, minimizing the visual impact of grout lines and making the tiles appear larger. This is particularly beneficial in small spaces where many grout lines could make the space feel cluttered. Darker grout, conversely, can create a more defined and dramatic look, but it may make the space feel smaller and more confined.
Choosing a grout color that complements, rather than contrasts sharply with, the tile color is usually the best approach for a small bathroom.
Visual Enhancements
A small bathroom, while compact, needn’t lack personality or visual appeal. Careful consideration of artwork, plants, and accessories can transform a cramped space into a stylish and inviting sanctuary. The key is to select items that maximize visual impact without sacrificing precious square footage. Strategic placement and mindful selection are crucial to achieving a balanced and aesthetically pleasing result.
Incorporating visual interest in a small bathroom requires a delicate balance. Over-decorating can easily make the space feel cluttered and even smaller. The goal is to add personality and charm without compromising functionality or creating a sense of confinement. This can be achieved through careful selection of artwork, plants, and accessories, focusing on pieces that are visually impactful yet compact.
Artwork Selection for Small Bathrooms
Choosing the right artwork is essential. Large, bold pieces can overwhelm a small space, while several smaller pieces can create a busy and chaotic feel. Instead, consider a single, impactful piece of art that complements the overall bathroom design. A framed print, a small painting, or even a stylish mirror can serve as a focal point without dominating the room.
For example, a framed botanical print in a minimalist frame would enhance a nature-inspired bathroom design, while a vibrant abstract piece could add a touch of modern flair. Alternatively, a strategically placed mirror can not only add visual interest but also create an illusion of more space.
Using Plants to Enhance a Small Bathroom
Plants can add life and vibrancy to any space, and a small bathroom is no exception. However, it’s crucial to select plants that thrive in humid environments and don’t require excessive space.
- Small potted succulents or cacti: These low-maintenance plants require minimal watering and tolerate low light conditions, making them ideal for small bathrooms.
- Air plants (Tillandsia): These unique plants don’t require soil and can be displayed in small glass containers or mounted on the wall, freeing up valuable counter space.
- Trailing pothos or ivy: These vining plants can be placed in hanging planters to add vertical interest without taking up floor space. Their cascading leaves create a lush, natural feel.
Decorative Accessories for Small Bathrooms
Accessories should be chosen carefully to avoid clutter. Opt for a few carefully selected items that add personality without overwhelming the space.
- A stylish soap dispenser and toothbrush holder: These functional items can also be aesthetically pleasing, adding a touch of elegance to the counter.
- A small scented candle or diffuser: These add a pleasant aroma and create a spa-like atmosphere without taking up much space.
- A decorative towel rack: A uniquely designed towel rack can serve both a practical and decorative purpose.
- Small, decorative trays: These can be used to organize toiletries and keep the counter tidy while adding a touch of style.
Using Patterned Tiles to Add Visual Interest
Patterned tiles can add a significant design element to a small bathroom, but careful consideration is necessary to avoid making the space feel smaller. Large, bold patterns can be overwhelming, while small, intricate patterns can appear busy.
A good strategy is to use patterned tiles as an accent wall, perhaps behind the vanity or in the shower. This creates a focal point without overwhelming the entire space. Alternatively, a subtle pattern, such as a delicate floral print or a geometric design in muted tones, can add visual interest without making the room feel cramped. Using lighter colors in the pattern will help to keep the space feeling open and airy.
For example, using a patterned tile with a light background and a darker, less dominant pattern will allow the pattern to add visual interest without overwhelming the small space. Avoid large, dark, busy patterns in small bathrooms, as these will have the opposite effect and make the room feel smaller and more cluttered.
Budget-Friendly Ideas: Small Bathroom Remodel Ideas
Revitalizing a small bathroom doesn’t necessitate a complete overhaul; significant improvements can be achieved on a budget. By focusing on strategic updates and smart shopping, you can create a refreshed and functional space without breaking the bank. This section explores cost-effective ways to transform your small bathroom, offering practical tips and examples.
Cost-Effective Bathroom Updates
Three budget-friendly methods for updating a small bathroom without a full renovation include repainting the walls and updating the grout, replacing outdated fixtures with affordable yet stylish alternatives, and incorporating inexpensive DIY décor elements. Repainting walls in a light and airy color instantly brightens the space, while refreshing grout can make a significant visual impact. Replacing dated fixtures with more modern options offers a significant upgrade without the expense of a complete refit.
Finally, adding inexpensive DIY elements, like new towels and a stylish shower curtain, can personalize the space and create a cohesive look.
Affordable Fixtures and Fittings
Numerous retailers offer stylish and affordable fixtures and fittings suitable for small bathroom remodels. For example, a sleek, single-lever faucet from a home improvement store can replace an outdated model for a fraction of the cost of a high-end designer option. Similarly, a simple, yet modern, toilet can be found within a reasonable budget. Consider ceramic or porcelain options for durability and easy cleaning.
Replacing the showerhead with a low-flow, high-pressure model not only saves water but also improves the showering experience. Finally, a simple, yet well-designed, medicine cabinet can provide ample storage space without compromising the aesthetic appeal of the bathroom.
Budget Maximization Tips
Careful planning and strategic purchasing are crucial for maximizing your budget during a small bathroom remodel.
- Shop Around for Deals: Compare prices from various retailers, both online and in-store, to find the best deals on fixtures, fittings, and materials. Look for sales, clearance items, and manufacturer rebates.
- Prioritize Essential Upgrades: Focus on the most impactful upgrades first, such as replacing the toilet or vanity, before tackling less crucial elements. This allows you to allocate your budget effectively.
- DIY Where Possible: Undertake tasks like painting, minor repairs, and installing simple fixtures yourself to save on labor costs. This can significantly reduce the overall expense of the project.
- Reuse and Repurpose: Consider reusing existing fixtures or fittings that are still in good condition, such as the medicine cabinet or light fixture. This can free up funds for other necessary upgrades.
- Choose Affordable Materials: Opt for cost-effective yet durable materials like ceramic tiles instead of more expensive options such as marble or natural stone. This doesn’t compromise the overall look and feel of the finished project.
Small Bathroom Remodel Budget Plan
This budget plan illustrates a small bathroom remodel focusing on key upgrades. Prices are estimates and may vary based on location and specific choices.
| Item | Quantity | Unit Cost | Total Cost |
|---|---|---|---|
| Paint (walls and trim) | 1 gallon each | $30, $25 | $55 |
| New Faucet | 1 | $75 | $75 |
| New Showerhead | 1 | $40 | $40 |
| New Toilet | 1 | $200 | $200 |
| Grout | 1 container | $20 | $20 |
| New Shower Curtain and Accessories | 1 set | $50 | $50 |
| Labor (painting and fixture installation) | 8 hours | $50/hour | $400 |
| Total Material Costs | $435 | ||
| Total Labor Costs | $400 | ||
| Total Project Cost | $835 |